Tuesday, October 2, 2012
3rd Grade Color Mixing and Self Portraits
These 3rd grade self-portraits were charming and delightful. We spent two class periods mixing colors for the background. Each student experimented with combining colors to see what would happen. Then, we used construction paper to make the faces and markers to add details. I guided them step-by-step with tips for drawing and placing the features. The students used mirrors when drawing their features.
Sunday, September 30, 2012
Halloween Ideas
Hello! Halloween is quickly approaching. It is one of my favorite times of year. Too bad my daughter (3 years old) is scared of costumes and does not like them. She has said a firefighter costume *might* be okay and she might possibly put one on. I'm not doing any Halloween themed after school art classes this year (I have a shrinky-dink one that I am doing this week), but I thought I would re-post some of my fun Halloween projects from the past.
Spider Thumbprints
Halloween Wreaths-- this was super fun and awesome, but it was a lot of preparation for a class (many hours shopping). I would do this again with a small group of kids.
Thursday, September 27, 2012
Complementary Color Collages-- 1st Grade
Complementary Color Collages
by the 1st Grade
![]() |
| A bag with orange and blue materials. |
Preparation: Gather colorful materials and place them in ziploc bags according to complementary pairs. I include: paper scraps, colorful tape, foam letters and pieces, stickers, colored cellophane, pompons, crepe paper, paint chip samples and stamps. I have these fun marker stampers: Crayola 10 Count Expressions Washable Mini-Stampers
After the introduction, I place the bags of complementary color "stuff" at different tables. Then I say, "All the students who want to use orange and blue in their collage, sit at this table." and so forth. Usually the class is pretty evenly distributed. Then, they use the materials however they would like to make a complementary color collage.
I like this project because it allows the kids to explore the materials in their own self-directed way. Each of them comes up with such unique ways to put the materials together.
At the end of the class, whatever is left over gets put back in the bags and I save them for next year (and replenish them as needed.)
![]() |
| in progress collage. |
![]() |
| Kids open up the bags, share what's inside and talk about the materials with their neighbors. |
![]() |
| This imaginative boy turned his collage into a sculpture! |
![]() |
| This boy enjoyed drawing lots of fun pictures with his markers. |

-->
How do you teach about complementary colors to
the youngest students?
Tuesday, September 25, 2012
Alphabet Art: First Grade
This is a lesson I love to teach at the beginning of the year. The first graders create a picture using letters. I show them how draw the letters and stack them, twisting and turning the page, making sure to connect the letters. Below is an example of the shapes formed from the letters. I really loved this one, because even though the boy used letters (a lot of "O's) to make the design, it is very abstract and not immediately recognizable as letters. I especially like the little dangly letters at the bottom.
After drawing with pencil, the letters are outlined with black marker and the spaces colored in with markers. Some of the pictures contain clearly drawn letters, others look more abstract, with the letters layered and overlapping.
I showed the students a Powerpoint of artwork from Stuart Davis, who incorporated a lot of letters, words and numbers in his art. I wanted to show the students how text can be a part of art and how the shapes of letters can be a very interesting element to use in an artwork.
When teaching art history with the little kids, I keep it short and at their level. Show them some artworks, ask them to tell me what they notice about the artwork "What else do you see? What do you think he was thinking when he made this? What are the colors like?, etc" If there is a good children's book to go along with the artist I will read them that. The whole art history portion is kept brief, because when the kids come in to art class they are itching to just make art! This Powerpoint had about 7 or 8 slides. Using Powerpoints is an essential part of my teaching! I use a powerpoint for about 1/3 of the lessons I teach. I should write a blog post about how I use them.
Anways, I hope you enjoyed this lesson and it is a really fun one at the beginning of the year. I think it is great for teaching the kids to see an every day subject matter (the alphabet) and using it in creative way. Also, every single one of these turns out just beautiful and I really enjoy seeing how they arrange their composition.
![]() |
| This one is great because he included Chinese writing as well. |
Friday, September 21, 2012
Kindergarten Line Drawings
This is one of my favorite kindergarten projects and it is perfect to teach at the beginning of the year.
Lines are introduced and we talk about the many types of lines... straight, zigzag, loopy, wavy, etc. Then I show them how they can make dotted and dashed lines, lines that start out wavy and then become spiky and even lines that are made by placing shapes in a row.
The kindergartners start with a black marker and draw the lines across the page (9x12": I find that drawing on a small piece of paper is good for this project, because the kids get tired of coloring neatly after a short time) This usually takes the entire first class period (40 minutes).
The second class period, I show them how they can color in the shapes and in between the lines.
This is also a good sub plan lesson if you choose to use it that way, since it uses just a few materials and is pretty straightforward to teach.
And, if you are just starting out with teaching art or are looking to buy art supplies, I recommend Blick art materials... and Nasco too. Nasco is awesome! Honestly, I've bought supplies from just about every major art supply company and those two are my favorites. Michael's is good for when you need to just pick up a couple things. Did you know that there is almost always a 40% off coupon (on one item) on their website? NEVER go to Michael's without printing off a coupon from their website. Also, they give 15% off of every purchase for TEACHERS. Just make sure to bring in your teaching id or paystub and you will get a discount. You can't combine coupons though. Joann's does the discount too, but you have to go through a little more of a process to sign up for the discount card.
Thursday, September 20, 2012
Giveaway Results plus LINKS
Beverley Baird you are the winner of the Gelli Plate! Send me your postal address and I will mail it to you. (I used a random number generator to pick the number 5, for the 5th comment on the blog post.)
Links to Check Out:
I am LOVING this awesome flip book video all hand drawn. Breathtaking!
What do you think about Performance Based Pay? Weigh in at the Art of Education.
I need to order this kolaj magazine!
I love this Lego lesson. My husband would love this.
Free Webinar from the Journal Fodder Junkies
Links to Check Out:
I am LOVING this awesome flip book video all hand drawn. Breathtaking!
What do you think about Performance Based Pay? Weigh in at the Art of Education.
I need to order this kolaj magazine!
I love this Lego lesson. My husband would love this.
Free Webinar from the Journal Fodder Junkies
Monday, September 17, 2012
Pop Art pictures: 2nd grade
“Don’t think about making art, just get it done. Let everyone else
decide if it’s good or bad, whether they love it or hate it. While they
are deciding, make even more art.” Andy Warhol
The 2nd graders learned about Andy Warhol. We read Getting to Know Andy Warhol, by Mike Venezia and we viewed a short video about the artist.
**** You have one more day to enter the Gelli Plates Giveaway on my blog! *****
The 2nd graders learned about Andy Warhol. We read Getting to Know Andy Warhol, by Mike Venezia and we viewed a short video about the artist.
The students drew themselves while looking in a mirror. Then, I photocopied each drawing so the students had multiple copies (copy a few extra in case a student doesn't like a result and wants to try again.) They colored each picture in different colors. Then, four pictures were mounted on to a piece of construction paper.
![]() |
| I really like the radiating yellow lines on this one. |
![]() |
| Andy Warhol's Self Portrait |
![]() |
| This student did an excellent job capturing all of the details in his self-portrait. |
![]() |
| This boy spent a lot of time carefully coloring all these patterns! |
![]() |
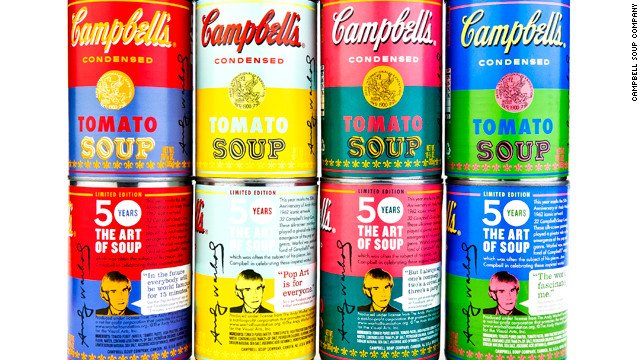
| And of course, I picked up a couple of the new Campbell's soup cans to show the students. |
**** You have one more day to enter the Gelli Plates Giveaway on my blog! *****
Saturday, September 15, 2012
Gelli Art Plates Giveaway!

A representative from the Gelli Arts company emailed me a few weeks ago and asked if I wanted to try one of their gel printing plates and of course, I said yes, because I love free stuff. I had seen these on a few different mixed media blogs and my curiosity was piqued, but I shied away from them because of the price. Yesterday, I received two printing plates. One to try out and one to give away to the readers on my blog! If you would like a chance to win, comment below and I will randomly draw a winner.
I pulled out the gel printing plate to try during one of my very small classes today and the kids loved it. They loved the gelly texture of the plate.
![]() |
| Roll the paint onto the gel plate with a brayer. Then, use objects to gently press texture into the plate. |
![]() |
| Place the paper onto the plate and rub the back. |
![]() | |
| Peel it off and there's the print! |
The texture shows up really nice. I like how you don't need to use printing ink, but just regular acrylic paint. After lifting two prints, the plate is pretty much sucked clean, so there wasn't a lot of clean up for the plate.
I am planning to buy a few more plates and let the kids try these out in stations.
The children were just so excited to use this! If you would like to a chance to win a Gelli Arts printing plate, leave a comment below.
** EDIT: I will ship outside the U.S., so anyone can enter. You don't have to be a follower of my blog... but I always love new readers! The plates are REUSEABLE. You can use them over and over again. If you press too hard (like scratching it with a pencil) the texture will stay and imprint on to future prints. We used ours several times already and the texture has erased clean. I'm planning on buying one for about every 3 kids and then the kids can take turns using them. ***
Subscribe to:
Posts (Atom)