Showing posts with label clay. Show all posts
Showing posts with label clay. Show all posts
Sunday, December 9, 2012
Egyptian Clay Sarcophagus-- 4th/5th grade
These are the fun sarcophagi the 4th/5th graders made from clay. We spent a few days learning about Egyptian art and drawing them on paper. See my previous post about the drawings.
Due to my finger problem, I'm not going to type out full directions for the clay sarcophagus.. but we traced the template onto slabs of clay for the top and bottom, built the bottom up with coils and then carved designs in the top of the box. Kids could either carve or paint their hieroglyphs on the box. We used regular acrylic paints and some fun gold tempera paint to paint these. (only one firing before painting.)
A couple of side notes: I am completely fine with them changing their clay sculpture from the preliminary drawing, personalizing it and not using typical Egyptian sarcophagus colors. It is a good idea to embrace the change as your ideas progress from the first idea to final artwork.
Thursday, July 5, 2012
Clay Suns-- third grade
I told you I had a bunch of lesson plans that I have not shared with you yet. I have enough to take me through the whole summer! Here are some simple clay suns. We looked at some pictures of the Metapac clay suns.
Labels:
clay,
Mexico,
third grade
Friday, June 1, 2012
Clay Flowers in Pots- 2nd Grade
This is a picture-heavy post!!
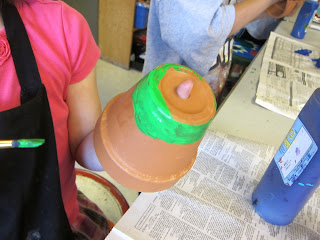
The 2nd graders reminded me that we had not done any clay this year yet! How could that be? So I decided to try this project that I come up with based on a clay flower in a pot that my sister-in-law has. I'm not sure where she got the flower but I think it was picked up at an art fair or something... We used regular firing clay, acrylic paints, beads, and a flower pot to construct our creation. Other things we used were wooden skewers, paint markers, styrofoam and fake grass.
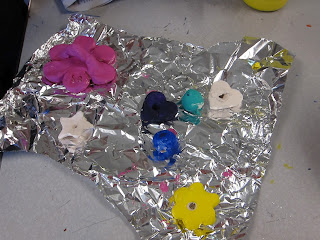
1. Make beads with clay: roll out slabs and cut out your shapes. Poke a skewer through them to ensure they will fit on the stick. Fire and paint with acrylics. Next year, I am ordering a bead hanger for glazing, so they can be glazed beads.
Make a flower: roll out a slab and cut out the large flower. We did use cookie cutters for the flower shapes, but of course you can cut them out yourself.
We were pressed for time, so we wanted to work quickly.
We were pressed for time, so we wanted to work quickly.
 |
| The flower needs to have a coil "handle" on the back so that the skewer can slip though it. |
2. Cut a styrofoam ball small enough to fit in the bottom of a flower pot.
3. Place the styrofoam in the flower pot.
4. Press a skewer into the styrofoam. Put fake grass in the pot to cover the styrofoam.
5. Paint the pot. You can do this at any step in the process.
6. Place the beads and the flower on the skewer. You can use a combination of the clay beads and pony beads or other commercial beads.
6. After you place the clay flower on, poke another fake flower into the pot for extra decoration.
 |
| Fake flower on top! |
 |
| We decorated the beads with paint markers! |
Labels:
clay,
flower,
gifts,
second grade
Saturday, March 10, 2012
3rd/4th grade Clay Projects
My 3rd/4th grade class made clay pots. We looked at the Mimbres pottery of the Southwest Native Americans, but I did not require them to use any of the imagery in their pottery. They could choose to add glaze designs however they wished. These are all coil built pots and glazed with Amaco Stroke and Coat glaze.
Labels:
clay
Sunday, February 19, 2012
Snippets of Art
 |
| Another collaborative artwork.. by 4th/5th graders |
 |
| And the last collaborative artwork, also by 4th/5th graders |
 |
| A very cool dish made by a 4th grader |
 |
| This page contains 8,000 stick people. Well, I didn't count them, but that's what the student said. They are drawn on both sides. A 6th grader brought this in to show me, isn't it cool? |
 |
| front page of stick people.. Each block is 100 people. |
 |
| close up of stick people groups |
 |
| back page of stick people |
Friday, January 27, 2012
Clay Butterflies-- 1st Grade
These lovely clay butterflies were made by the 1st graders. Each student traced their hands to make the wings. Some of the little parts fell off, so I would recommend making sure that the kids don't roll their slabs too thin. I found this lesson in the book, The Clay Lady Way Textbook. I was able to flip through this book at one of the National Art Ed conferences and decided it would be worth the investment.
Saturday, January 14, 2012
Kindergarten Clay
The kindergartners made two clay projects before break. They made little pinch pots and pressed shells on the sides for texture. We glazed these with Stroke and Coat glaze.
We also made these fun coiled hearts.
1. Demonstrate how to roll coils with your fingers.
2. Pass out a handout with a heart drawn on it (I just free hand drew a heart and photocopied it.)
3. Place the coil on the outside edge of the heart and wrap it around. Then roll another coil and place it on the inside of that one. Keep going until the whole heart is filled in. Smoosh the coils together a bit so they are secure.
4. Poke a hole with a pencil.
5. After they are glazed and fired, tie yarn or ribbon through the hole for a fun wall hanging or ornament.
Subscribe to:
Posts (Atom)


